네이버 지도 API 활용 앱 - 5( Glide 이미지 코너 커스텀 하기, dp to pixel)
-
Naver Map API
-
ViewPager2
-
FrameLayout
-
CoordinatotLayout
-
BottomSheetBehavior
-
Retrofit
-
Gilde
ListAdapter, RecyclerView, Include
- include(bottom_sheet.xml) layout id 추가
기존 activity_main.xml 에서 include했던 layout 파일에 id를 지정해주자
<!--activity_main.xml-->
<!--include, id를 새롭게 추가해서 MainActivity에서 접근 가능하게 만들자-->
<include
    android:id="@+id/bottomSheet"
    layout="@layout/bottom_sheet" />
- item_house.xml 파일 추가
<!--item_house.xml-->
<?xml version="1.0" encoding="utf-8"?>
<androidx.constraintlayout.widget.ConstraintLayout xmlns:android="http://schemas.android.com/apk/res/android"
    android:layout_width="match_parent"
    android:layout_height="wrap_content"
    xmlns:app="http://schemas.android.com/apk/res-auto"
    xmlns:tools="http://schemas.android.com/tools">

    <ImageView
        android:id="@+id/thumbnailImageView"
        android:layout_width="0dp"
        android:layout_height="0dp"
        app:layout_constraintTop_toTopOf="parent"
        app:layout_constraintStart_toStartOf="parent"
        app:layout_constraintEnd_toEndOf="parent"
        android:layout_margin="24dp"
        app:layout_constraintDimensionRatio="3:2"/>

    <TextView
        android:id="@+id/titleTextView"
        android:layout_width="0dp"
        android:layout_height="wrap_content"
        app:layout_constraintStart_toStartOf="parent"
        app:layout_constraintEnd_toEndOf="parent"
        android:layout_marginTop="12dp"
        app:layout_constraintTop_toBottomOf="@id/thumbnailImageView"
        android:textSize="20sp"
        android:textColor="@color/black"
        android:layout_marginHorizontal="24dp"
        android:textStyle="bold"
        tools:text="강남역!! 최저가!!"/>

    <TextView
        android:id="@+id/priceTextView"
        android:layout_width="0dp"
        android:layout_height="wrap_content"
        app:layout_constraintStart_toStartOf="parent"
        app:layout_constraintEnd_toEndOf="parent"
        android:layout_marginTop="12dp"
        app:layout_constraintTop_toBottomOf="@id/titleTextView"
        android:textSize="24sp"
        android:textColor="@color/black"
        android:layout_marginHorizontal="24dp"
        android:textStyle="bold"
        tools:text="13,000원"/>

</androidx.constraintlayout.widget.ConstraintLayout>
- bottom_sheet.xml 에 RecyclerView 추가
기존 view 부분을 RecyclerView로 교체
<!--bottom_sheet.xml-->
<androidx.recyclerview.widget.RecyclerView
    android:id="@+id/houseRecyclerView"
    android:layout_width="0dp"
    android:layout_height="0dp"
    app:layout_constraintBottom_toBottomOf="parent"
    app:layout_constraintEnd_toEndOf="parent"
    app:layout_constraintStart_toStartOf="parent"
    app:layout_constraintTop_toBottomOf="@id/lineView" />
- HouseAdapter.kt 추가
// HouseAdapter.kt
class HouseAdapter: ListAdapter<HouseModel, HouseAdapter.ViewHolder>(diffUtil) {
    inner class ViewHolder(private val binding: ItemHouseBinding): RecyclerView.ViewHolder(binding.root){

        fun bind(house: HouseModel){
            binding.titleTextView.text = house.title
            binding.priceTextView.text = house.price

            Glide.with(binding.thumbnailImageView.context)
                .load(house.imgUrl)
                .into(binding.thumbnailImageView)
        }
    }

    override fun onCreateViewHolder(parent: ViewGroup, viewType: Int): ViewHolder {
        return ViewHolder(
            ItemHouseBinding.inflate(
                LayoutInflater.from(parent.context),
                parent,
                false
            )
        )
    }

    override fun onBindViewHolder(holder: ViewHolder, position: Int) {
        holder.bind(currentList[position])
    }

    companion object {
        val diffUtil = object : DiffUtil.ItemCallback<HouseModel>() {
            override fun areItemsTheSame(oldItem: HouseModel, newItem: HouseModel): Boolean {
                return oldItem.id == newItem.id
            }

            override fun areContentsTheSame(oldItem: HouseModel, newItem: HouseModel): Boolean {
                return oldItem == newItem
            }
        }
    }
}
MainActivity.kt에서 리사이클러뷰 사용하기
// MainActivity.kt
private val houseRecyclerView by lazy{ binding.bottomSheet.houseRecyclerView }
private val houseAdapter = HouseAdapter()

...

    houseRecyclerView.adapter = houseAdapter
    houseRecyclerView.layoutManager = LinearLayoutManager(this)

...

    // 레트로핏으로 통신 성공 하면
    houseAdapter.submitList(houseDto.items)

...
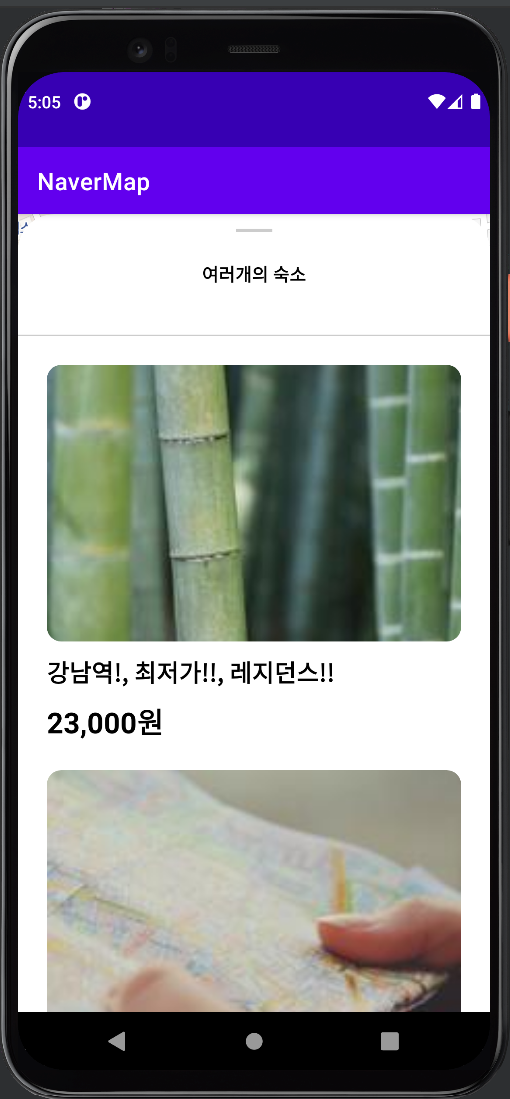
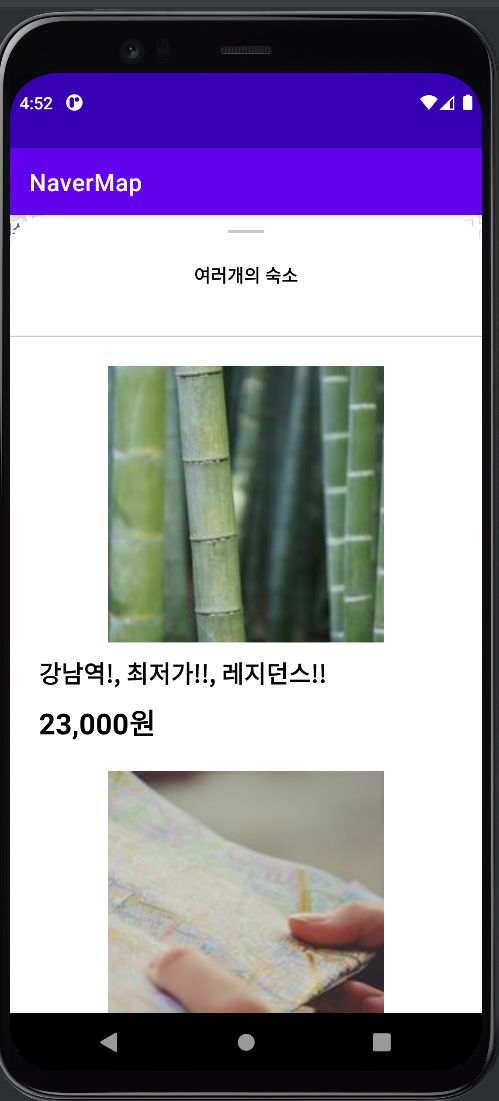
결과 화면
Glide 사진 커스텀하기
사진을 둥글게, Ratio 3:2 가 미적용된 Glide 사진에 비율 적용 시키기
// HouseAdapter.kt

...
    Glide.with(binding.thumbnailImageView.context)
        .load(house.imgUrl)
        // 3:2 비율을 조정해 줌,
        .transform(CenterCrop(), RoundedCorners(dpToPixel(binding.thumbnailImageView.context, 12)))
        .into(binding.thumbnailImageView)
...

    // context 를 활용해 dp값을 pixel로 변경
    private fun dpToPixel(context: Context, dp:Int):Int{
        return TypedValue.applyDimension(TypedValue.COMPLEX_UNIT_DIP, dp.toFloat(), context.resources.displayMetrics).toInt()
    }